Thursday 30 December 2010

Rigging - What i can take forward...

I took on rigging as i am to be head of rigging within our team. Its something i decided i would be better at then most other creative areas within animation.

I needed to develop my skills for rigging three characters that are to be in our film. The bird, the marmot and the mongol. They are all quite different quirky characters and they all will have very different rigs to make.

A bird rig, quite challenging as i haven't done different rigs then the two legged two armed characters.

The mongol and the marmot both needed to run and jump and be as flexible as possible. If I am able to paint the weights right on these two characters then, I think we can get good animation from them.

Rigging- What i Have learnt

Before i started this unit, I had a very basic understanding of rigging, and when I started to learn more of rigging, I decided i quite enjoyed doing it. I didn't really have a good understanding or painting weights on a character, but now i believe have a better knowledge of doing it, and feel i can do it well.

I still need to use tutorials in places where I get things wrong, but I think that in time I will be better with more practice. I think this unit has allowed me to gain a better knowledge and understanding of rigging and I would like to believe I could go into this profession when i leave uni.

I can now rig to a closer professional standard a Biped character:

Things to work on in future: Blend shapes and Four-Legged characters.

Painting weights in Maya 2011 - The new tool - 01

Here i have been playing with the new paint weights tool in maya2010.
I have been getting used to using the handles to change theinfluence on the vertices. Thered colouris high influence, where thr blue is low influence. It seems pretty easy so far.... I then use the paint weights tool to tidy everythingup slightly howi learnt in maya08. thishas given me a very good result.


Rigging_ Painting the Weights - Influence


This is a Mixture of images for what the influence looks like on the character once i have painted the weights on the character.

It then helped to mirror the painted weights so it all looked and worked the same....


Timing for Rigging

Since the Beginning of term i have found that i was very slow with rigging a character as i wasn't sure of what i was doing. So one character rig took me aprox 6 full days to complete.
I had some major difficulties with painting the weights on the character as its a long and boring process.
I found when i learnt the painting weights on maya 2010 that the process is a lot quicker and now i believe i can rig a character properly in roughly four days.
I feel i have progressed a long way from when i started the term and when i move on to rigging the characters for real this term coming, i think I feel confident enough to get a good rig going for our characters.

Each week i have tried to learn a different skill within rigging.

I concentrated on:

Painting weights maya 2008
Painting weights maya 2010
Naming of joints and placing of joints
Joint orientation
Ik handles - With IK spline, Ising Sticky and Non-sticky

Rigging by myself problem two - IK handles

Here i have done a couple of tests to get a feel for the different settings for IK handles, as i found i had a couple of problems with using IK sticky earlier on in the Term.


Here i was testing the difference between and IK handle with sticky and onewithout sticky.

Left in video is without and Right is with sticky.

As you can see the Right holds better to the floor when the "leg" is straight, where as the Left without sticky doesn't.


Rigging by myself Problem one -Joint Orientation


This week i concentrated on joint orientation and making sure that the joints were correct for rigging purposes. This was because i had some issues with orientating my joints, as i found they were not moving in the correct way....

for this i looked at this tutorial, which is about rigging a tongue character. I found it very helpful.

Joint orientation.


Tutorial took from it was:

http://www.swinburne.edu.au/design/tutorials/maya/rigging-common-techniques-tongue-creature/Creature-Rigging-02-Joint-Orientation-Reverse-FootLock/Creature-Rigging-02-Joint-Orientation-Reverse-FootLock.htm

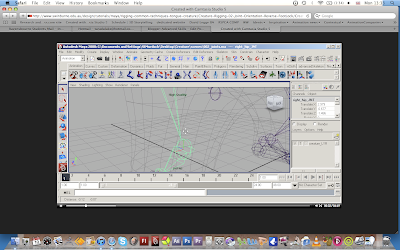
The Y axis should be going down the joint.
The Z axis is facing forward on the joints.

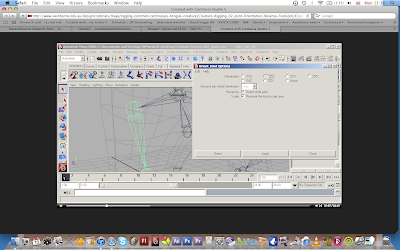
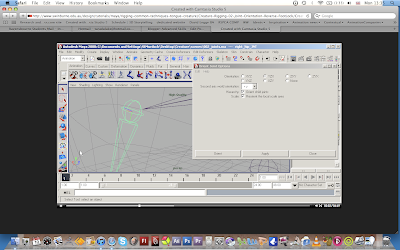
In the option box i need to use: +Y with the Orient child joints on and the reorientate localscale on as well.

This is done by selecting all the joints, but i don't necessarily need to re-orientate the root joint, an i can just leave that where it is.


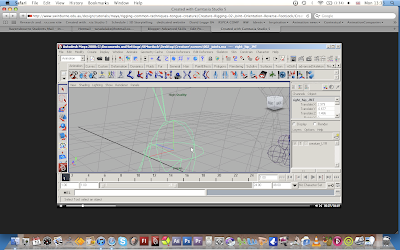
Here is a close image of the default settings given when maya creates a Joint.

Everything relates to the world axis, which is not what we want..... we want everything to relate to the joints or bones, So the Y axis needs to move down the joints.


The third picture is from the tutorial. This is showing the option Box and the settings needed for my characters.


As we can see here the Y axis is going Down the joints.


This final image is what's needed for my joints to look like.